
The Complete Guide to Wood Burning
for Beginners.

Are you ready
to start cranking out amazing wood burned pieces?
Over the years I've shared a LOT of wood burning for beginners info on blogs, in classes, YouTube tutorials, and my own books....basically all over the place. Now it's time to put it all in one place in a complete start-to-finish guide along with some downloadable content to aid in your learning.
Table of Contents
In this guide, I'm covering these topics (feel free to skip to the section you need)
FREEBIES & RESOURCES
Download the Template Pyro Pack to get you started burning and grab my books on Amazon with step by step instructions for beginners. There are so many great projects to help you on your burning journey.


Equipment
Wood burning equipment is where I get the most questions. There are a ton of options out there and it's overwhelming when you're just getting started. Not to mention, it can get really pricey, so it's hard to take a leap and buy a piece of equipment that costs $200 or more when you don't know how to tell if it's any good or not.
I've used several different types of burning pen units and I'm going to let you in on where to start what I think is the best of the best.
Note: Before we get into this section, let's address some controversy. Tips or Nibs. You'll here pyrography artists refer to the metal pen tips as nibs or maybe tips. There is some debate as to what the correct answer is, and I tend to go with, "who the hell cares, let's just burn some shit!" But seriously, I tend to use both terms, so if you see nibs, or tips, it's the same thing....the metal end that gets really hot.

Brass Tip Kits...aka the solid metal tip pens
These are the solid brass tip kits that you see in the arts and crafts stores. The brass tips screw into the wand/pen and it plugs right into the wall. This is a great place to start and where most people start.
When you are a beginning wood burner, these pens are inexpensive and easily found in art stores, hardware stores and online. You can grab one of these, start wood burning and get a feel for how it all works...the wood, the heat, the finished project.
Here's the rub with these. They don't get very hot. When I first used one of these, I was disappointed that it didn't melt through the wood with ease. I had high and unrealistic expectations that I would be able to quickly burn and for only $30.
The reality is, these are beginners tools that help ease you into burning and they don't have all the features that an expensive wire tip set has. You can truly burn anything with these pens. There's no rule that says you have to upgrade to a wire tip. You can absolutely accomplish any burn project you want with these, it's just slower.


Brass Tip Brands that I Trust and Recommend.
All three of the brands I'm recommending below are companies I've worked with in some way through collaborating. I know first hand that they make quality products and actually care about the customers that use their products. They offer customer support and service and great product.
Important Note: If you are in the market for a wood burning tool, avoid buying those kits on amazon that have a no-name product with 80+ pieces. Most of the pieces are NOT for wood burning and it's just a money grab product to entice you with a lot of pieces for a low price.
If you have already purchased one of those kits, it's okay. It will get you by and help you get into burning, but if/when it breaks, you'll have to just buy a new wand, there won't be any support for you.
I recommend these brands to start with. They cost the same as those no-name kits and are much higher quality and offer support. Let's dive in.
Truart.
They offer a single wand kit or a double wand kit. Product Review. The double wand comes in handy because these units take a long time to heat and cool, so having two makes the process quicker when you want to use two different nibs on a project. I HIGHLY recommend getting two wands. It will make burning more enjoyable if you don't have to wait so long to change a tip.
These wands also have two different heat settings (which is really all you need here). I always burn on the highest heat setting because I like texture. But if you're burning lighter shades, it's nice to be able to cool it down with a lower temp option.
These kits from Truart also come with a lot of nib options that are high quality brass tips and you can get one with a handy case that holds the nibs. It's a very nice kit, and the only brass tip option I use anymore.

Walnut Hollow.
This company has a LOT of wood burning equipment and wood. If you really get into wood burning, you will get to know them well. They have a model called the Versa Tool that is a great wand option. Product Review
It has several heat settings (even though you'll stay on the highest heat for wood). If you ever want to burn canvas or paper, the lower heats are nice. It also comes with several nibs and a plastic case.
Walnut Hollow also has single pens that you can buy that aren't in a kit, so you could easily buy two wands without having to buy two whole kits.

Chandler Tool.
Another great company that offers a quality burning wand with a lifetime warranty. This wand doesn't have any heat settings, but it's well made and has several nibs in a kit. I like this wand because it's simple and no nonsense...just plug and go. And it's inexpensive, so again, grab two if you go with this one.
There you go. A few great options. Pick one and start burning


Wire Tip Kits...aka the expensive pens
I call these the expensive because, well dang it they are expensive. It's a costly hobby that requires a commitment after you purchase one of these wire tip kits. There are some cheaper knock-off no name options on Amazon, but I suggest staying away from those. If you ever have a problem, you'll want a company that offers support.
There are several brands that are good choices, so I'll list them here, but I'm only going to go into detail about a couple of them otherwise, this page would be a mile long.
Great Wire Tip Brands:
There may be more, but these are brands I'm personally familiar with and have used. They all offer high quality burning pens with customer support. Here are the the two brands I use the most and why.
And both of these are great. You'll love either one. Don't over think it.
Truart.
I've had my Truart Dual Pen unit for about four years or so and it's still one of my favorites to use. It's also the most cost effective on the market. As of today, the dual pen kit is $250 and it comes with a TON of tips, plus a lot of great extras. Some of the tips are duplicated in case you break them. I've had mine for four years and none of them have broken. Most other kits only give you a few tips, then you have to start buying additional ones.
Let me hit you with the highlights in bullet form:
-
$250 for the kit
-
2 Wands/Pens
-
60+ Nibs - some repeats in case of breakage
-
Consistent and Reliable High Heats
-
Heats and Cools in Seconds
-
An Awesome Pen Holder
-
Cleaning Accessories
-
Customer Support
What I personally love about this unit that you won't see listed as a feature, is that the wand stays cool even when I'm burning on super high heats, which I love to do. It's a thicker wand, but that doesn't make it hard to hold. Other wands that have a smaller pen-like size tend to get really, really HOT and can become hard to hold and you'll end up using a glove or finger guards. Not this one.
It does have nibs that have to be handled by hand, so I highly recommend getting the unit with two pen hook ups.
You will love this burning unit.
Razertip
My other favorite. I've used Razertip for several years now. Razertip is the crème de la crème of wood burning pen brands. The high quality, attention to detail and customer satisfaction isn't matched on the market. The pens, the units, and the options are a plenty. There is something for everyone and they live up to the hype. Product Review
The catch is that with such high quality comes high cost. It's one of the most expensive brands on the market, but it's a good investment. You'll build a relationship with your burn unit overtime and you want to invest in one that will be around for the long haul and have your back as an artist. You can count on that with Razertip for sure.
They have several models to choose from, but I actually like the base model, the SK. It's the least expensive unit, starting at $120 for the unit only. Once you start adding wands/nibs that price changes. If you get the biggest kit with the wands and nibs, it jumps to $340.
I like to buy the model, then add the pens I want. And honestly, you only need a handful, but we'll get into what nibs to use in a bit.
Let me hit you with the highlights in bullet form:
-
Very High Quality
-
A Huge Variety of Nibs/Wands
-
Amazing Customer Service (I've heard amazing things, but never had to call them personally)
-
Consistent and Reliable High Heats
-
Small Pen Like wands that are easy to hold
-
Heats and Cools in Seconds
-
A Reliable Brand
What I love about about this brand is how easy it is to use. I have the fixed wands, and they are a snap to change. You don't have to worry about cooling it off because you don't have to handle the hot metal nib. Just grab the wand, pull it from the cord and then attach a new one.
I also love how small the power box is. It barely takes up space on my desk, which is a big deal for me. I don't like bulky stuff.
Summary
Now that I've rambled on forever about this, let me sum up. Truart good. Razertip good. Pick one and start burning art.


NIBS...aka Tips
No matter what brand of burn you have buy or have, you'll need nibs (or tips).
There are two different kinds you'll see.
Fixed vs Replaceable
Fixed pen wands, which just means that the metal nib and wand are all one piece. You don't handle the metal tip at all.
Replaceable Tips, which means the tips detach from the wand and then you and insert and change the metal tips.
Some brands offer both like Razertip and Colwood. Some only offer one option, like Optima only offers fixed wands. While Truart and Burnmaster only offer replaceable tip wands.
One is not better than the other. I've have used both many, many, many times. I can't tell a difference in the burning. I've heard some say that the fixed wands have better performance, but it's such a small difference that I don't notice.
For me, the only notable difference is the price. The replaceables are cheaper, but not less than.
Which nibs do you need and what do they do?
I get this question a lot. People want to know what each nib does and how to use it.
Over the years, I've honed in on my art style, so there's only a few nibs I ever use anymore. A writing tip, a ball tip, a shader tip and a skew tip. Really this is all you'll need, but keep experimenting. Your style will be different than mine.
The Writing Tip.
This is tip is rounded in one way or another. Each kit will offer a different shape, but it's basically and rounded metal wire (or rounded brass nib). Because of my particular line art style, this is the tip I use the most. It's rounded shape makes it perfect for gliding across the wood so easily.
It's also great for texture and you guessed it, writing. I don't personally use it for writing words, but you can.
I love to use it for creating deep textured swirls and lines. LOVE IT.
Perfect for: Lines, Writing and Texture

The Ball Tip.
This tip is exactly what is sounds like. A metal tip with a ball at the end. You'll see them in varying sizes, and if you have a brass tip wand, there are usually a couple of different rounded tips that can be used just like the wire ball tips.
It's similar to the writing tip because it's rounded, but unlike the writing the tip, the ball tip is a perfect round ball so it glides even better across the wood.
The most fun way to use this tip is for stippling, which is a fancy word for dots. You can stipple a texture pattern or shade (like pointillism). It's absolutely so much FUN to stipple, which is also fun to say.
And because it's similar to the writing tip, I've seen people use it for writing cursive letters. I don't use it for that because I'm terrible at it, but some people are amazing with it. So again, experiment and see how it works for you.
Perfect for: Texture, Stipples, and Writing.

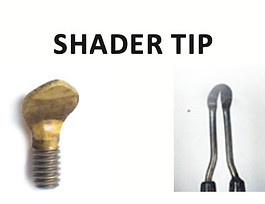
The Shader Tip.
The shader tip is mostly used for exactly what it's named for...shading. Every burn pen brand offers a shader nib. it may come in your kit or may have to buy it separate, but it's there somewhere. It may be flat or round, or some brands offer both. Either way, you can shade with it.
Shading is what people think of when you talk about realism. A lot of new comers to wood burning want to learn how to create realistic (some called 3D) art. Realism is a great way to sell commissioned artworks of pets or families.
I was a realistic wood burner for several years before honing my personal art style and I used the the Colwood Spoon Shader nib for many years. If you ever watch my old YouTube videos, you'll see it in there.
You can achieve light tonal shades, or dark tonal shades with this tip. You can also use the edge for creating burn lines. And you can even crank up the heat and use it to create cool deep texture patterns. It's probably the most shockingly versatile nib you can use.
Perfect for: Shading tonal values, Lines and Texture
The Skew Tip.
Another great in the nib in the kit. It's also referred to as the knife tip. It's basically a straight slanted metal edge and it's perfect for making straight lines that cut through the wood with crisp precision.
You may see different varieties of it. I like the ones with the curved front edge so that it doesn't get caught in the wood.
If you have a brass tip kit, it's usually called a universal nib.
I used this nib for years when I was burning more signs, letters, and silhouette types of art pieces. You can use the skew for outlining your artwork to get a nice clean, crisp outer edge to your art.
You can also use it for texture. I love to use it as a way to fill in my silhouette pieces with different line patterns of deep texture.
Perfect for: Outlining art, Straight Lines, Texture
Summary
While there are a ton of options out there, and I do suggest you experiment, these four are a good place to start. If you have a kit with preselected nibs, there's a good chance one or all of these are in it. They are the most commonly used and versatile options.
Again I say, don't fixate on what they are "supposed" to do. Decide what you need first, and choose one that will help you get there.


The Best Woods for Wood Burning
The wood you choose for a project can make or break it. Not all wood is good for burning. Some woods aren't safe, are too sappy, have inconsistent grain patterns and some are just plain terrible to burn and don't receive the heat well.
When I teach newbie burners about wood, I tell them to start with what's easily accessible, practice with that, then experiment with more exotic woods later once you've gotten some experience.
The first thing you need to look at in wood, is the grain. Pine is the perfect example of what not to use. The grains in pine don't make for an ideal burning. The light one is too soft and the dark one is too hard, so it's difficult to get a consistent burn.
I've seen a lot of new wood burners get frustrated and quit because they think they are doing something wrong. Pine is everywhere in stores and online and it's cheap. So people pick it up and try to burn it and end up with a bumpy mess. It's not the people, it's the wood.
Try these instead.
Basswood
This is the best one. Seriously. It's a light, soft, dry grain, so it burns beautifully. The grains are wonderfully consistent so it's easier to get a consistent overall burn. It's also in the art stores and online, it's not cheap however, but it's also not the most expensive, so yay.
You can get in soooo many cuts, shapes and styles like live edge...aka bark. This is a great wood to burn, I can't recommend it enough.

Birch
A great alternative to basswood. You'll mostly see birch in a plywood form (layers). The top layer is often a solid sheet of wood like a veneer layer, so it's thin. Then you'll see composite layers, which is compressed and glue.
There's some controversy here about whether or not glued up plywood is safe to burn. There are a lot of artists that use it and I've never heard of anyone reporting long term or short term issues with it. However, take safety precautions and proceed at your own risk.

Poplar
You can find this one in the big box stores. Poplar is great for burning. It's soft and it comes in a larger planks, so if you're used to handling power tools, it's easy to cut and make your own canvases at any size you want.
There is a grain pattern to these, but they are pretty consistently soft, with minor bumpiness. I love to use it for sign projects, but you can also use it for realism and tonal shading.

Maple
I love, love, love maple for burning. It's soft, has beautiful grains and displays art so gorgeously. It's harder to find in my area, so I order it online from KJP Select Hardwoods. They have good prices and beautiful wood.

Woods to Avoid Burning
Pallet Wood. Not safe. Don't burn it.
MDF. Medium Density Fiberboard. It's not wood; it's a compressed mess of glue and wood particles.....in other words, it's full of chemicals. Don't burn it; it's not safe.
Pine. You can, but it's not much fun unless it's on a larger scale and it's silhouette work.
Red Oak. Same as pine. You can burn it, but the sappiness and the difference in grains make it a pain to work with. If you want to try it out, get a small scrap, do a small test burn and see what you think. You don't wan to build a big canvas and then hate burning it.
Cedar. I've heard it's not safe, I don't recommend it.
Check this wood database to search for particular woods to burn.
If you ever come across a wood that you aren't sure about, try this wood safety site to research. As a precaution, use a respirator with organic rated filters and burn in a well ventilated area.
Really, even if you are burning a wood that is safe, use a respirator with organic rated filters and burn in a well ventilated area because well, it's smoke. You shouldn't breathe any of it in and it's not worth any health risks.
Here's the mask and filters I've used for years.

Safety
When you talk about wood burning, we gotta touch on safety, so let's go through it. I also have a YouTube video on safety, so if you want to see safety in action, check it out.
Wand Placement.
Be careful about where you place your wands. Make sure your burning pens are secure on a table away from any paper, fabric or flammable chemicals. When you walk away or leave them room, turn them off/unplug them.
Smoke.
Take safety measures to deal with the smoke. You can use a smoke extractor or a fan. If you are indoors, open a window and use a fan, wear a mask or respirator. I keep a fan on my desk and another in the window; that helps pull it away from my face and out of the room. You can also use a respirator with filters to prevent inhalation.
Wood Types.
Not all woods are good for wood burning. Some of them give off toxins that aren't safe to breathe when you burn them. Check this wood toxicity database for particular woods that are okay to burn.


Art and Graphics
Where do you get reference content, templates and graphics? There are a ton of places and you'll find your favorites, but I'll share my favorites with you to help you get started.
Creative Fabrica
This is my favorite place to go for reference materials. There are fonts, photos, graphics, and all kinds of content to help you create templates. There is also a section for daily free gifts, so check it everyday for free stuff.
You can purchase items individually or you can get a subscription and download a lot of the content. I also like that the content comes with a commercial license, so you don't need to purchase an additional license to use the content in your art in order to sell your art pieces.
Artist Reference Sites
You can find a lot of artist reference sites that offer photos specifically for artist to use in their art. The wildlife reference site below has a ton of great options for a one-time price.
https://wildlifereferencephotos.com/
Take Photos Yourself
This is a really underrated option. Most people have a smart phones now a days and the cameras take great pics. I highly recommend taking your own pics and turning them into art pieces.
Take a walk around a park, the zoo, a city street and see what grabs your attention. Take pics of patterns, small objects, butterflies, birds, animals, or anything you see that strikes you.
Print them out and use them as templates in your pieces. I'll get into templates in the next section.


Prepping Your Canvas
More steps before burning, yes please! You gotta prep the wood for burning.
Supplies:
Sanding the Wood
This is my least favorite part of the whole process. I would love to skip it, but I don't because it improves my overall finished piece.
The purpose of sanding is to give you a smooth surface to work with so that your pen can glide across the surface with less resistance. Even brand new canvases right from the store need sanding. For example, when you buy a basswood canvas, it seems pretty smooth, but if you look close, it has small fine filaments. They can get it the way and cause unevenness in your burn project.
First, get a fine grit sand paper and an electric sander (you can sand by hand, but you'll save time and money getting a sander). I like an orbital sander with a minimum of 220 grit. You can go higher in grit like 400, 800, etc. For my particular style of burning, 220 is fine, but try a higher grit and see what works for you.
You want to sand until the wood surface is so smooth that it doesn't feel like wood anymore. It will have buttery, glass like smooth surface. It may take 30 minutes or so. Some artists step up their grit as they sand. So they'll start with 220 and sand for 15 minutes, then go up to 400 grit and sand for another 15 minutes. This is particularly helpful when you are burning hyper realistic type pieces.
I find that these steps are overkill for me personally, but again, experiment and find a process that works for you.

Transferring Images to the Canvas
There are a lot of ways to do this, but I like the ole simple carbon paper transfer. It's cheap, simple and doesn't require a lot of setup. The only drawback is that carbon is hard to get off the wood (not impossible though), so you need to be mindful and careful when handling the carbon paper in order to avoid unwanted marks.
First, you want to print your template. You can open a free layout program like GIMP or Canva, layout your art work, then print it to the size you need it for your canvas.
Take your printed template, place it on the wood canvas where you want your art and secure it in place with tape.
Second, take a sheet of carbon paper (dark side down), and place it under the template. Then grab a pencil and trace your artwork outlines. Your marks will transfer to wood from the carbon.
Before removing your template, lift it and the carbon to make sure you have traced all your lines. Once you're done tracing your graphics, remove the template.
You'll have a beautifully transferred graphic onto the wood so you can start burning.


Wood Burning Techniques
Let's talk about a few techniques before we put them into practice. Keep in mind, these are techniques I use and put into practice. I recommend searching out other wood burning teachers and artist and learn as much as you can from as many wood burners as you can.
Overtime, you'll develop your own skill set and style of pyrography. These techniques are a good place to start.
Outlining
Outlining is just what it sounds like. You outline your artwork before filling it in. This is typically used when you are burning silhouettes, lettering, logo and signage types of pieces...basically anything with a hard edge. I use a skew tip that has a nice straight angled edge to outline the art of my template.
This step will ensure having a clean, crisp outer edge to your art, which will give it a professional finished look.

Texture
This is my FAVORITE thing about wood burning. I love to burn deep texture on high heats because it's just plain fun. Texture is what i use to fill in heavy burning spots, lettering, silhouettes, or any area that needs a consistent dark burn.
I also use texture in my line art work. Adding deep texture to a piece gives it more interest and a beautiful finish.
You can also use texture to create the appearance of a shaded look, like stippling. Even though all the stipples are the same shade, the density of the dots is what makes it look like a shadow or a highlight. The more dense the dots, the more shade; the looser the dots, the more highlighted.

Shading
Shading is all about creating different tonal values from very light shades, to very dark shades. There are a ton of ways to do this, hatching, cross hatching, scumbling, pulling, stipples, and line art.
Shading is what a lot of people are working toward in learning about burning. You may want to learn about shading portraits and start burning realistic imagery so you can commission art and sell pieces. It takes a lot of time to learn how to do this and it will take time and practice to get it.
If you are completely new to drawing, I highly recommend a drawing for beginners class in order to learn more about shading. The fundamentals in drawing will help you GREATLY in learning to wood burn realistic imagery because so many of those skills transfer to pyrography.
Here's a video and a downloadable example sheet that will guide you through your first shading exercise.


Color Options
Sooo many ways to add color. This is another area for you to experiment and test different ways to add color to your pieces. Get CREATIVE!
I've tried watercolors, colored pencils, acrylics, stains, fabric, paper, jewels, gold leaf, ink, markers, resin, embossing glitter, and alcohol ink.
Watercolors are my favorite because they are easy to use, they stain the raw wood and don't cover up the burn lines.
Supplies:

Watercolors
Watercolors are my absolutely favorite way to add color. They stain the wood without covering up burn lines, but they are still very vibrant. I use the Winsor and New Cotman palette.
Here's a watercolor tutorial with details steps on how I add color to burns.

Inks
Inks are similar to watercolor in that it's a staining type of color and it doesn't cover up the burn area. The different here is that it's harder to manipulate the color palette. Watercolors are easier to mix and create custom colors.
It's doable with inks, just a bit more challenging. I like to use the Dr. Martin brand of inks.


Sealing the Wood
I get a ton of questions about sealing too. Sprays are my favorite. They are quick, easy to use and don't mess with the paint colors. My top two favorites are Lacquer spray and Polycrylic spray.
Supplies:
Spraying the Wood
I typically use painters pyramids to prop up my wood piece, spray the back with an even light spray; flip it and spray the front. I let it dry complete, give it a light sand with a 220 grit sand paper. You don't want to sand it much, just enough to knock off the roughness from the spray. Give it a second and/or third coat, with a light sand after each coat dries. I usually only do two coats.
I like to use a satin finish, but that's my personal choice. I like a little bit of a sheen, but not high gloss or matte. You can experiment and find out your favorite.

Live Edge Bark Sealing
If I'm using a live edge wood, I use modge podge and a sponge brush to seal the bark in place, otherwise it flakes off all over the place. This step always comes after spraying the wood with a sealant and letting it dry completely. Lightly dab the wood with the glue and let it dry. Lay the canvas on the painters pyramids so it can dry.


Hanging Your Art
I always like to tell people how to hang art because there's so little advice about it any where else. I use two methods, THe D-Ring method, or the sawtooth hanger method. For my large pieces, I use the D-Ring with wire, and for small pieces I use sawtooth hangers.
Note: If you want to put art into an art show, they usually want a wire hanger option, so it's good to have on hand.
Supplies:
I'm not going to go into a lot of instruction on this one. These are pretty self explanatory.

Summary
Now you have a great start to learning how to burn with the basics covered. Get started with some easy projects and step by step instructions, templates and supply lists.
Get Started with Projects
I have two published books you can find on amazon that go into detail even more about wood burning techniques. There are 19 projects in my first book and 16 in my second, so lots of great stuff to get you burning.
Step-by-Step Pyrography - 16 Projects
Drawing with Fire - 19 Projects
YouTube Channel
You can also join me on YouTube for tutorials and new videos coming out regularly.
Thanks for reading!!!
